That moment of panic is all too familiar: you glance down to see a bold, waxy smear on your favorite shirt’s collar or your sofa’s armrest. A lipstick stain isn’t just a spot of color; it’s a spreading, greasy menace that seems to get bigger with every attempt to wipe it away. This frustrating behavior isn’t your imagination—it’s chemistry. Lipstick is a carefully engineered blend of waxes, oils, and pigments designed to adhere. When it transfers onto fabric, heat and pressure can melt the wax base, driving the oily pigment deeper into the fibers, while common missteps like rubbing or using hot water can cement it permanently. Understanding this “spreader” nature is the key to stopping the stain in its tracks. The good news is that you can safely remove a lipstick stain from fabric with a calm, methodical approach using items you likely already have at home.
To safely remove a lipstick stain from fabric, first scrape off any excess wax with a dull knife, then pre-treat with a solvent like dish soap, rubbing alcohol, or a pre-wash stain remover. Always check the fabric’s care label and test your cleaning solution on a hidden seam first to prevent damage. Work from the back of the stain, blot (don’t rub) with a clean cloth, and rinse with cold water before laundering as usual. With prompt action, most fresh stains come out completely.
Why Lipstick Stains Are So Tricky (The Science of Spreading)
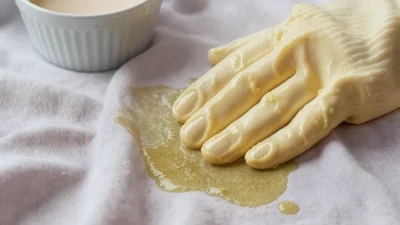
That smudge on your collar isn’t just a simple dye mark. Lipstick is a carefully engineered cosmetic wax stain, and its unique composition is precisely why it loves to spread. At its core, lipstick is a blend of waxes, oils, and pigments. The wax gives it structure, the oils provide glide and moisture, and the pigments deliver the color.
When lipstick transfers onto fabric, this blend behaves in a frustratingly predictable way. Heat from your body or friction can melt the wax, causing it to seep deeper into the fibers. The oils act as a binding agent, locking the pigment in place. If you make the common mistake of trying to clean lipstick from fabric with water or a water-based cleaner first, you’ll often just push the oily pigment deeper, setting the stain permanently. Understanding this “science of spreading” is the key to choosing the right removal strategy from the start.
Photo by www.kaboompics.com on Pexels
Your Lipstick Stain Removal Toolkit
The good news is you don’t need specialty products. You can tackle most lipstick stain on shirt incidents with items already in your home. Having these gathered before you start will make the process smoother and more effective.
- A dull knife, spoon, or credit card: For gently scraping away excess wax without damaging the fabric.
- White paper towels or clean, white cloths: Essential for blotting; colored towels can transfer dye.
- Liquid dish soap (like Dawn or Fairy): A degreaser that breaks down the oily base of the stain.
- Rubbing alcohol (isopropyl alcohol, 70%+): A powerful solvent for breaking down the wax and pigment. Always test first on a hidden seam.
- A pre-wash stain remover spray or stick: A convenient option containing similar solvents.
- Cold water: For rinsing, as hot water can set the stain.
Photo by cottonbro studio on Pexels
The Safe Removal Protocol: Step-by-Step
This is your battle plan for a fresh stain. Follow these steps in order to safely remove lipstick stain from fabric. Remember: always check the garment’s care label and test any cleaning solution on an inside seam or hidden area first.
Step 1: Scrape & Blot (Don’t Rub!)
Using the dull edge of a knife or spoon, gently scrape off any excess, caked-on lipstick. Work from the outside of the stain inward to avoid spreading it. Then, place a few layers of paper towels underneath the stain. On top, use a clean cloth dampened with cold water to gently blot, lifting fresh pigment out of the fibers. Replace the paper towels underneath as they absorb the color. Rubbing will grind the stain in deeper.
Step 2: Apply a Solvent
This is where you attack the wax and oil. You have a few effective options:
Dish Soap: Apply a small drop directly to the stain, gently working it in with your finger or a soft brush. Let it sit for 5-10 minutes.
Rubbing Alcohol: Dampen a cotton ball or the corner of a white cloth with alcohol and dab (don’t pour) it onto the stain. You should see the color transfer to the cloth.
Pre-wash Spray: Apply according to the product’s directions, typically spraying generously and letting it penetrate.
Step 3: Rinse and Launder
Rinse the treated area from the backside with cold running water, pushing the stain out the way it came in. Once the stain appears gone, wash the garment normally with your regular detergent in the coldest water temperature the fabric allows. Do not put it in the dryer until you are 100% certain the stain is completely gone. Air-dry it first to check. For comprehensive guidance on general stain principles, resources like the University of Minnesota Extension’s stain removal guide offer excellent foundational advice.
What If the Stain Is Old or Set-In?
Don’t lose hope if you’ve already washed and dried the garment, setting the stain. The process for lipstick on fabric removal is similar but requires more patience. You’ll likely need to repeat the solvent application step multiple times.
Start by applying your chosen solvent (dish soap or a pre-wash treatment is often best for set-in stains) and let it soak in for at least 30 minutes, or even overnight for tough cases. After soaking, gently work the fabric together and rinse with cold water. You may need to repeat this soak-and-rinse cycle two or three times before laundering. For delicate fabrics you can’t scrub, soaking the entire stained area in a bowl of cold water with a bit of dish soap for several hours can slowly lift the stain.
Dos and Don’ts to Prevent Disaster
Keep this quick list in mind to turn a potential laundry disaster into a simple fix.
- DO blot and dab, never rub or scrub.
- DO use cold water for rinsing and the first wash.
- DO test your cleaning solution on a hidden area first.
- DO check the stain is gone before using the dryer (heat sets stains).
- DON’T apply heat (hot water, dryer, iron) to the stain until it’s fully removed.
- DON’T use a colored cloth to blot, as the dye may transfer.
- DON’T skip the scraping step for heavy, waxy stains—it removes the bulk of the problem.
Keep Your Cool and Your Clothes Clean
A lipstick stain doesn’t have to ruin a favorite piece of clothing. By understanding why it spreads and following the right protocol, you can tackle both fresh and set-in stains effectively. The key is acting quickly, using the right solvents for the wax and oil, and avoiding heat until you’re sure the stain is history. With a little patience and the common household items outlined here, you can confidently handle these colorful accidents.
For the future, a simple preventive step can save you hassle: let your lipstick fully set and dry before putting on tops or scarves. For chronic issues, like transfer onto shirt collars, a light spray of a stain-preventative product on the vulnerable area before wearing can provide a helpful barrier.
You can find a deeper explanation here: Cooking Oil Stains on Clothes.