You’ve scrubbed, sprayed, and scoured, but that stubborn stain in your shower or ring in your sink just won’t budge. The most common mistake in bathroom cleaning isn’t using the wrong product—it’s attacking the wrong stain. Soap scum, rust, and hard water deposits each have a unique chemical makeup, and using a rust remover on a soap scum film is like using a hammer to fix a software bug: it creates more problems than it solves. This guide cuts through the frustration by serving as your diagnostic manual. We’ll help you become a stain spotter first, learning to identify the enemy by its look and feel, then provide the precise, actionable protocol to eliminate it for good. Effective sink, tub, and shower stain removal isn’t about elbow grease; it’s about smart strategy.
Effective sink, tub, and shower stain removal starts with correct identification. Soap scum requires a degreaser, rust responds to a mild acid, and hard water buildup needs a dissolving agent. Using the wrong cleaner is the most common mistake. Always test your chosen method in an inconspicuous spot first to ensure surface safety.
Diagnose First: A Spotter’s Guide to Bathroom Stains
Before you grab a scrub brush, take a moment to look closely. The single most effective step in sink, tub, and shower stain removal is correct identification. Using a rust remover on soap scum is a waste of effort, and scrubbing hard water scale with a degreaser can make it worse. This quick guide helps you play detective.

Soap Scum: The Greasy Film
This is the most common culprit. It forms when the fatty acids in soap bind with minerals in hard water, creating a sticky, tenacious film. Look for: A white, gray, or yellowish haze that feels slippery or tacky to the touch. It often coats shower doors, tiles, and tub walls uniformly, making surfaces look perpetually dull. If your finger leaves a streak in the film, it’s likely soap scum.
Rust Stains: The Orange Spots
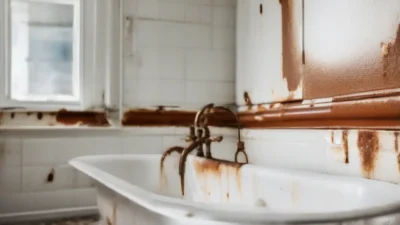
These are mineral stains from iron oxide. They can come from your water supply (well water is a common source) or from a metal object left in the tub, like a shaving cream can or a bottle cap. Look for: Distinct orange, reddish, or brown spots or streaks. They often appear around drains, under metal fixtures, or in spots where rusty water dripped and sat. The stain is in the surface, not on it.
Hard Water Buildup: The Chalky Scale
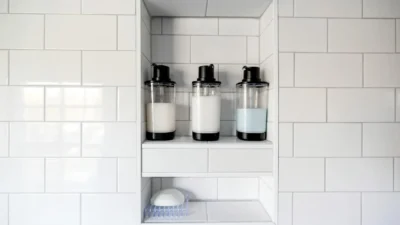
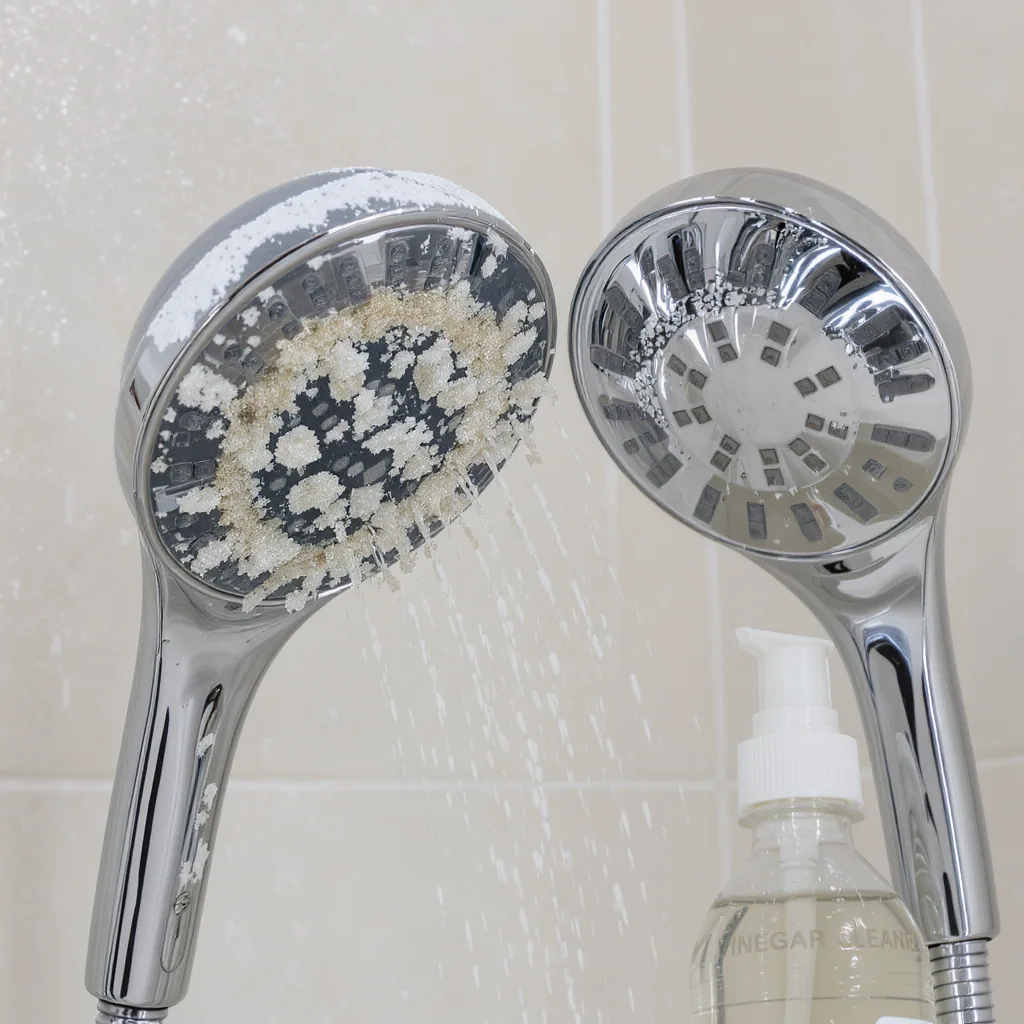
Also called limescale, this is crystallized calcium and magnesium from evaporated water. It’s the mineral deposit left behind after water droplets dry. Look for: White, chalky, or crusty spots. They feel rough and hard, not slippery. You’ll find them around faucet aerators, on showerheads (clogging the holes), and as a ring around the tub where water evaporates. This is a key part of any comprehensive bathroom buildup cleaning guide.
Protocol for Soap Scum: Cutting Through the Greasy Film
Since soap scum is essentially a grease-bound-to-minerals, you need a two-pronged attack: a degreaser to break down the fats and a mild acid to tackle the mineral component. Your goal is to dissolve the film, not just smear it around.
Your Cleaning Arsenal
DIY Power Duo: A 50/50 mix of white vinegar and dish soap is remarkably effective. The dish soap cuts the grease, and the vinegar dissolves the minerals. For tougher buildup, make a paste of baking soda and water or a squirt of dish soap for extra grit and scrubbing power.
Commercial Options: Look for bathroom cleaners specifically labeled for soap scum removal. They often contain surfactants (degreasers) and glycolic or citric acid. A daily shower spray used consistently can prevent film from forming in the first place.
Step-by-Step Removal
- Apply: Spray your vinegar/soap solution or commercial cleaner generously over the affected area. For pastes, spread it on with a cloth or sponge.
- Dwell: Let it sit for 5-10 minutes. This dwell time is crucial for the chemicals to break down the bond.
- Scrub: Use a non-scratch scrubber (like a melamine foam “magic eraser” or a nylon-bristled brush) to agitate the area. The film should start to loosen and turn milky.
- Rinse & Reveal: Rinse thoroughly with warm water. You may need to repeat for heavy, neglected buildup. For glass shower doors, a final wipe with a squeegee will leave it streak-free.
Prevention is simple: using a squeegee after every shower or a quick daily spray eliminates the constant need for deep soap scum and rust stain battles.
Protocol for Rust Stains: Neutralizing the Orange Menace
Rust stains require a chemical reaction. Iron oxide (rust) dissolves in acid. Therefore, your mission is to get a mild acid in contact with the stain for long enough to work. Abrasive scrubbing alone will not remove it and may damage the surface.
Choosing Your Weapon (Safely)
For Porcelain, Ceramic, & Fiberglass: Mild acids like lemon juice (citric acid) or white vinegar (acetic acid) are great starters. For stubborn stains, a commercial rust stain cleaner containing oxalic or hydrofluoric acid is more powerful but requires careful use—always follow label instructions and ventilate the area.
Critical Safety Note: Do not use acidic cleaners on natural stone (marble, granite, travertine) or on certain metallic finishes. The acid will etch the stone and ruin the finish. Always test in an inconspicuous spot first.
The Removal Process
- Isolate & Protect: If the stain is from an object, remove it. Dampen the surrounding area with water to prevent the acid from affecting clean surfaces.
- Apply Acid: Soak a paper towel or cotton ball in your chosen acid (lemon juice, vinegar, or commercial remover) and press it directly onto the stain. You want it to stay in contact, not dry out.
- Soak, Don’t Scrub: Leave the soaked material on the stain for at least 30 minutes, or even overnight for old stains. Re-wet if it dries.
- Remove & Rinse: Discard the paper towel. The stain should be lightened or gone. Gently wipe the area with a damp cloth. If a shadow remains, repeat the process. Avoid harsh scrubbing until the chemical has done its work.
Protocol for Hard Water Buildup: Dissolving the Chalky Scale
Like rust, hard water deposits are mineral-based, so they also respond to acids. The difference is often the thickness and location. Light spotting on a faucet requires a different approach than a crusty showerhead completely clogged with scale.
Tackling Light Spots & Filming
For faucets, shower doors, and tile: White vinegar is your best friend. Fill a spray bottle with straight vinegar, spray it on, and let it sit for 5-15 minutes. The acid will dissolve the scale. Wipe clean with a damp cloth or non-scratch pad. For extra power, sprinkle a little baking soda on a damp sponge after spraying with vinegar—the gentle fizzing action helps lift the residue.
Conquering Heavy Buildup & Clogs
For showerheads and faucet aerators: The soak method is unbeatable. Remove the showerhead if possible, or fill a plastic bag with vinegar and secure it over the showerhead with a rubber band. Let it soak for several hours or overnight. The crusty scale will soften and can be brushed away. For commercial solutions, products like CLR (Calcium, Lime, Rust remover) are formulated specifically for this hard water deposit removal task.
Important: Never use abrasive scouring powders or steel wool on acrylic tubs or fiberglass surrounds, as they will create fine scratches that attract more dirt and stain faster.
The Dos and Don’ts of Bathroom Stain Warfare
This quick-reference list synthesizes the key lessons from our protocols. Stick to these, and you’ll avoid the most common pitfalls.
- DO diagnose the stain first. Is it slippery, spotty, or crusty? This dictates your entire approach.
- DO let cleaners dwell. Whether it’s vinegar on limescale or acid on rust, contact time is non-negotiable for chemical action.
- DO test cleaners in an inconspicuous spot first, especially on colored surfaces, natural stone, or antique fixtures.
- DO ventilate the bathroom when using any strong chemical cleaners.
- DON’T mix cleaning chemicals, ever. Combining bleach with ammonia or vinegar creates toxic, dangerous gases.
- DON’T use abrasive tools (steel wool, harsh scouring pads) on delicate surfaces like acrylic, enamel, or glass. You’ll cause permanent scratches.
- DON’T scrub first. Apply your solution, let it work, then scrub. Scrubbing a dry stain can grind it in or damage the surface.
- DON’T use the wrong cleaner for the job. A degreaser won’t touch rust, and an acid won’t cut through grease-heavy soap scum efficiently.
Common Mistakes to Avoid
Even with the right protocol, a simple error can undo your hard work or cause damage. Here are the specific missteps to steer clear of in your bathroom buildup cleaning guide journey.
- Using Abrasives on Delicate Surfaces: Scrubbing fiberglass or a glossy acrylic tub with a harsh pad creates a network of tiny scratches. These scratches become magnets for future soap scum and stains, making the problem worse over time. Always opt for non-scratch scrubbers.
- The Deadly Chemical Mix: This cannot be overstated. Never mix bleach with ammonia (found in some glass cleaners) or with vinegar. The reaction produces chloramine or chlorine gas, which is hazardous to your health. Always use one product at a time and rinse thoroughly before switching.
- Skipping the Patch Test: That “universal” cleaner might not be universal for your vintage pink tub. Applying a strong acid or bleach to an unknown surface can lead to discoloration or etching. A minute spent testing behind the faucet or on a back corner saves heartache.
- Impatient Scrubbing: Seeing a stain and immediately attacking it with a brush is instinctive but often ineffective. You’re just spreading the stain or wearing yourself out. The chemical reaction needs time. Walk away for 10 minutes after application.
- Treating All Buildup as “Dirt”: This is the core mistake we began with. Assuming all stains are the same leads to using the wrong method. A crusty limescale ring needs dissolving, not degreasing. Correct diagnosis is 90% of the solution.
Your Bathroom, Stain-Free
The frustration of a stained sink, tub, or shower is now a problem you can solve with confidence. You have the map: first diagnose, then apply the precise protocol. Remember, soap scum demands a degreaser, rust yields to acid, and hard water buildup dissolves away. This isn’t just about cleaning; it’s about maintaining your home efficiently.
So, take that decisive next step. Look at your bathroom right now. Identify one stain—the hazy shower door, the orange spot by the drain, the crusty faucet—and attack it with the correct method. You now own a permanent guide to a cleaner, brighter bathroom, freeing you from guesswork and ineffective scrubbing for good.
Effective bathroom stain removal hinges on correct identification. Use this quick recap of the three core protocols:
- Soap Scum (slippery, filmy): Use a degreaser like dish soap mixed with vinegar. Let it dwell, then scrub with a non-abrasive pad. Prevent with a daily shower spray or squeegee.
- Rust Stains (orange/brown spots): Apply a mild acid (lemon juice, vinegar, or commercial rust remover) directly via a soaked paper towel. Allow 30+ minutes to work before rinsing. Never use acids on natural stone.
- Hard Water Buildup (white, crusty scale): Dissolve with white vinegar. Soak showerheads or spray surfaces and let sit. For heavy deposits, use a dedicated limescale remover.
Always test cleaners in a hidden area, avoid mixing chemicals, and prioritize dwell time over elbow grease for lasting results.