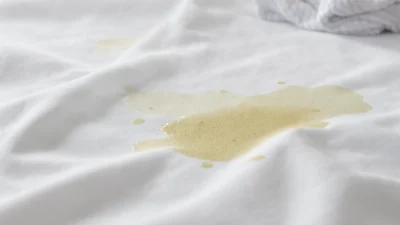
That moment of panic is universal: you spot a red wine splash on your favorite linen tablecloth, a muddy paw print on the living room curtains, or a mysterious grease stain on the duvet cover. Your first instinct is to grab a cloth and start scrubbing—but then you hesitate. What if you make it worse? What if the fabric shrinks, fades, or is ruined forever? This tension between the urgent need to act and the fear of causing permanent damage is at the heart of effective bedding and curtain stain removal. The truth is, the most critical step isn’t the cleaning solution you reach for; it’s the decision you make before you treat a single spot. This guide cuts through the confusion by framing stain treatment as a clear protocol, starting with one non-negotiable rule that separates successful salvage from costly disasters.
The first rule for any stain on curtains, bedding, or linens is to identify the fabric’s care instructions. For washable items, prompt blotting and targeted treatment is key. For dry-clean-only fabrics, avoid home remedies and take the item to a professional cleaner as soon as possible. Always check the care label first; for confirmed washable fabrics, you can proceed with specific stain removal steps, while dry-clean-only items require professional intervention for the best results and to avoid setting the stain.
The First Decision: Reading Your Fabric’s Care Language
Before you reach for any cleaner, your first and most critical step is to locate and understand the care label. This small tag holds the definitive answer to whether you’re dealing with a washable fabric or a dry-clean-only textile. Treating this label as a suggestion, rather than an instruction, is the fastest route to a ruined curtain or a shrunken duvet cover.
Decoding the Symbols and Terms
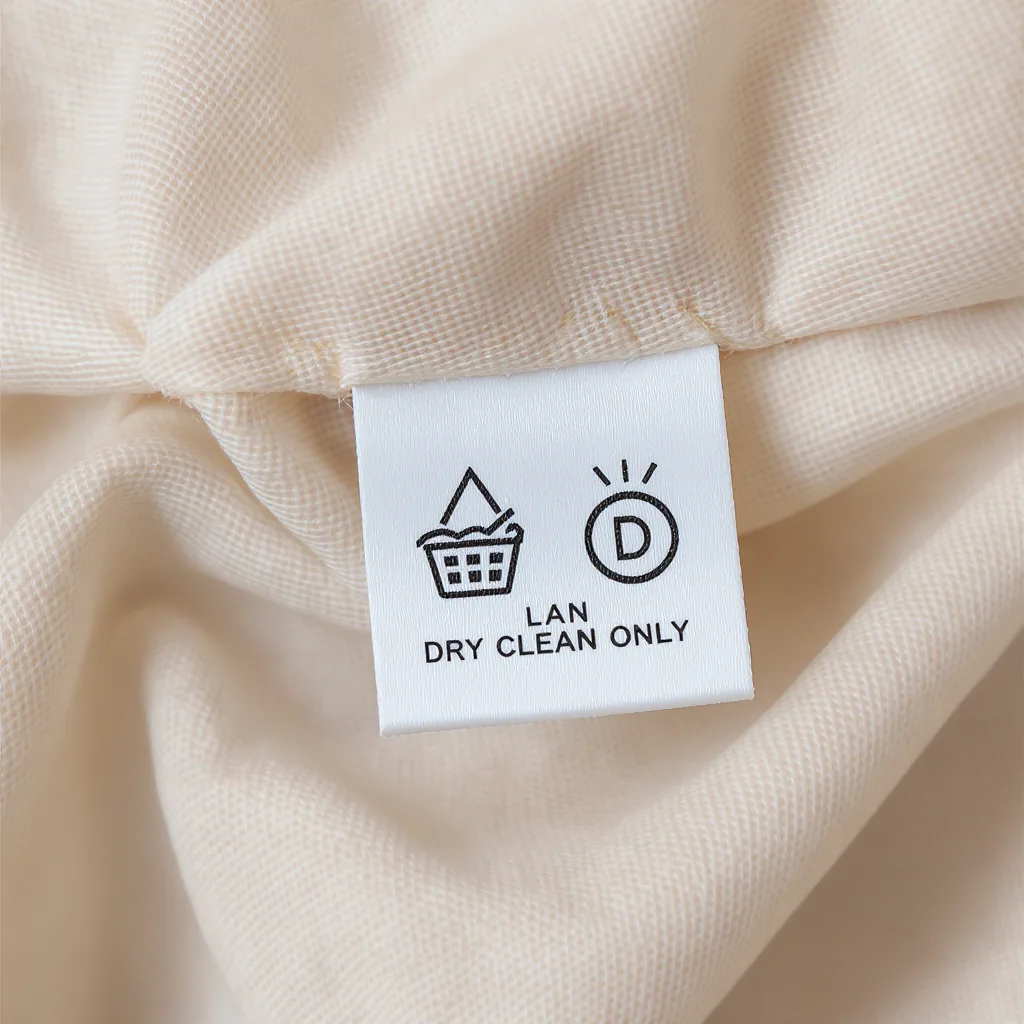
Care labels use a universal language of symbols. A washtub symbol means it can be washed; the number inside indicates the maximum temperature. A circle means dry cleaning is required. The most important distinction is between “Dry Clean” (which implies professional cleaning is recommended) and “Dry Clean Only” (which is a protective instruction you should follow to avoid damage). For a comprehensive guide to these symbols, you can refer to resources from organizations like The American Cleaning Institute.
Why the Label Says What It Does
The instruction isn’t arbitrary. It’s dictated by the fiber content (like delicate silk or wool) and the fabric’s construction. For example, many lined or interlined curtains are labeled “Dry Clean Only” because the different fabrics and linings may shrink or react differently to water and agitation. This foundational knowledge turns a panic-inducing spill into a manageable fabric care decision guide.
Your Washable Fabric Stain Removal Protocol
Once you’ve confirmed an item is machine or hand washable, you can move forward with confidence. This is your step-by-step bedding and curtain stain removal guide for cottons, linens, and durable synthetics. The goal is to act quickly and methodically.

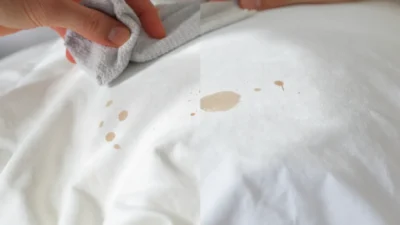
Step 1: Immediate Containment (Blot, Don’t Rub)
Use a clean, white cloth or paper towel to gently blot up as much of the spill as possible. Rubbing is a common mistake—it grinds the stain deeper into the fibers and can distort the fabric’s texture.
Step 2: Identify the Stain Type
Is it water-based (like juice, wine, or coffee) or oil-based (like grease, butter, or makeup)? Water-based stains often respond to water-soluble treatments, while oil-based stains need a solvent. Protein stains (egg, blood, dairy) require special care—never use hot water, as it will cook the protein and set it permanently.
Step 3: Apply a Targeted Pre-Treatment
For food or biological stains, an enzyme-based laundry pre-treatment is excellent. For oil or grease, a small amount of dish soap or a dedicated stain remover can break it down. For general linen stain cleaning tips, a paste of baking soda and water or a dab of white vinegar can be effective for many washable fabrics. Always test any treatment on a hidden seam first.
Step 4: Launder with the Right Settings
Wash the item using the warmest water safe for the fabric (per the label) with your regular detergent. Avoid overloading the machine so there’s plenty of agitation for the stain to lift. For stubborn stains, a second wash may be necessary.
Step 5: Air Dry & Inspect
This is the most important step for washable fabric stain care. Never put an item in the dryer until you are certain the stain is completely gone. The heat from a dryer will set any remaining residue permanently. Air dry the item, then check it in good light. If the stain remains, repeat the treatment before washing again.
When the Label Says ‘Dry Clean Only’: Your Action Plan
Discovering a stain on your best silk curtains or a wool blanket marked “Dry Clean Only” is stressful, but your action plan is simple and clear: your role shifts from cleaner to careful communicator. Home remedies are extremely risky on these fabrics, as water can cause dyes to bleed, fabrics to shrink, or textures to become stiff.
Your immediate goal is to safely contain the stain and get the item to a professional cleaner as soon as possible. Gently blot any excess liquid with a white cloth, but do not apply water, soap, or any spot treatment. When you take the item to the cleaner, point out the stain and tell them what caused it (e.g., “red wine, about 2 hours ago”). This information is crucial for their curtain stain removal process.
Your Dry-Clean-Only Emergency Kit
- A white cotton cloth or paper towels: For gentle, absorbent blotting only.
- A sealable plastic bag: To transport the soiled item without letting the stain dry and set during transit.
- The care label: Make sure it’s accessible or you can verbally confirm the instructions.
- Knowledge of the stain: Note what the substance was and when it happened.
Stain-Specific Strategies: A Quick Reference
This quick-reference guide assumes you’ve already made the washable vs. dry-clean decision. These are targeted actions for common culprits.
Red Wine (on washable fabrics)
DO: Blot immediately with a clean cloth. Sprinkle with salt or pour a little club soda over the area to help lift the pigment, then blot again. Pre-treat with a stain remover before washing in cool water.
DON’T: Rub the stain or use hot water, which can set it.
Cooking Oil & Grease (on washable fabrics)
DO: Apply a few drops of clear dish soap or a degreasing laundry pre-treatment directly to the stain. Gently work it in and let it sit for 15 minutes before washing in the warmest water safe for the fabric.
DON’T: Toss it in the wash without pre-treatment—the grease will just spread.
Ink (Proceed with extreme caution)
DO: For washable fabrics only, try dabbing with rubbing alcohol on a cotton swab, always testing first. For dry-clean-only items, blot gently and take it to a professional immediately—inform them it’s ink.
DON’T: Use water-based treatments on ink, as they can make it run and set.
Blood (on washable fabrics)
DO: Rinse under cold running water as soon as possible. Soak in cold water with a bit of salt or enzyme detergent. Wash in cold water.
DON’T: EVER use warm or hot water, which will cook the proteins in the blood and make the stain permanent.
Common Stain Removal Mistakes That Make Things Worse
Even with the best intentions, it’s easy to worsen a stain. Avoiding these common errors is just as important as knowing what to do.
Rubbing instead of blotting: This grinds the stain particles deeper into the fabric weave, making it harder to remove and potentially damaging fibers.
Using hot water on protein stains: As mentioned, heat sets proteins like blood, egg, or dairy. Always start with cold water for these.
Applying heat before the stain is out: Throwing a stained item in the dryer is a guarantee you’ll set the stain forever. Always air dry first to inspect.
Ignoring the care label: Assuming “it’s just cotton” or “a little water won’t hurt” on a dry-clean-only item leads to shrinkage, dye bleeding, and ruined finishes.
Using the wrong cleaner for the stain type: Applying a water-based treatment (like club soda) to an oil-based stain (like butter) won’t work and may spread the grease.
Letting the stain set: Time is your enemy. The longer a stain sits, the more it bonds with the fibers and the harder it is to remove.
Over-scrubbing delicate fabrics: Aggressive scrubbing can wear down the fabric surface, creating a permanent “worn” spot even if the stain comes out.
Shifting from Crisis to Care
The true mastery of bedding stain cleaning and curtain care isn’t just about reacting to accidents—it’s about proactive prevention. Take a quiet moment to familiarize yourself with the care labels on your favorite linens and drapes before a crisis strikes. This simple act builds your personal fabric care decision guide and eliminates future panic.
Furthermore, let this knowledge inform future purchases. For high-traffic or spill-prone areas, like a dining room or a child’s bedroom, prioritize machine-washable fabrics. Investing in quality, washable linen or cotton blends can offer both elegance and practicality. By understanding the “why” behind care instructions, you move from fearing stains to confidently managing your home textiles, preserving their beauty and longevity for years to come.
Successfully managing stains on home textiles hinges on one golden rule: always check the care label first. This single action splits your path into two clear protocols. For washable fabrics, act quickly with blotting, targeted pre-treatment, proper laundering, and always air-drying to check results. For dry-clean-only items, your role is to safely contain the stain and deliver the item to a professional cleaner with clear information. Avoiding common mistakes like rubbing, using heat prematurely, or ignoring labels is crucial. Ultimately, the best linen stain cleaning tips empower you to move from reactive stain panic to confident, proactive fabric care.